This Tutorial, "Want My Cupcake" was created on 27 May 2012 by me and is the registered property of Graphics4Fun PSP Tutorials. All my tutorials are registered with Tutorial Writers Inc, the Tagging Community's premier tutorial registration company.
This tutorial is written in and for PSP X2 and assumes you have an excellent working knowledge of PSP and Animation Shop. Please use my tutorial as a guideline and you are encouraged to try your own ideas.
Remember to save your work often. Finished tag will be over 1MB.
For this tutorial I am using "
Lucy Loves Cupcake", a tube by Kim Turner purchased from PSP Tube Stop. You need a license to use her work. Many thanks to
PSP Tube STOP for allowing me to use the wonderful work of Kim Turner.
You may use whatever font you wish. I am using a free font, "
Missed Your Exit". Click the link to download the font.
I am using Eye Candy 6, Glass effect. If you do not have Eye Candy, you can download the free trial version
here or skip that section and just add the drop shadow to the frame.
Lets Begin
Create a layer 600x275 (if you want to increase or decrease the tag size, you will need to adjust the percentage of the tube in the next step to suit your tag.) Open your tube and reduce to 45% and copy & paste the image with the background as a new layer. Flood fill the bottom layer with a color of your choice.
Duplicate the bottom layer and move it to the top.
Using the Selection tool set to "Rectangle", create & cut out a section of the top solid layer. I like to come in about 5/10ths (5 little lines), on the top and side and drag the rectangle box to the opposite corner, stopping at the same points. Once you have cut the center out, copy the frame and paste as a new image layer with a transparent background (you can delete this layer on the tag).
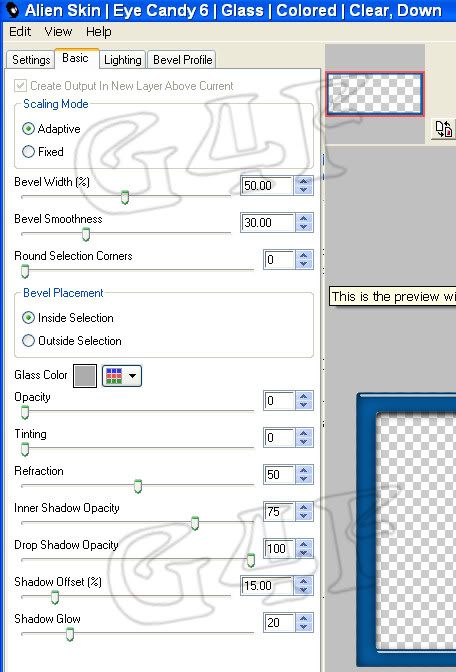
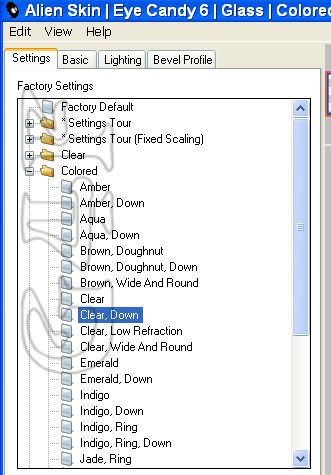
Go to your Eye Candy 6, Text_Selection, Glass and follow the 2 screenshots. The Bevel Profile is the Factory setting "Button". Add drop shadow with a V. & H. of "0" and the O. of 100, & B. 3.19. Color Black. On the frame I also add my credits and license number. Merge VISIBLE and carry to AS and leave it for now. ( For credits, I use Pixelette 8pts, anti-alias off).


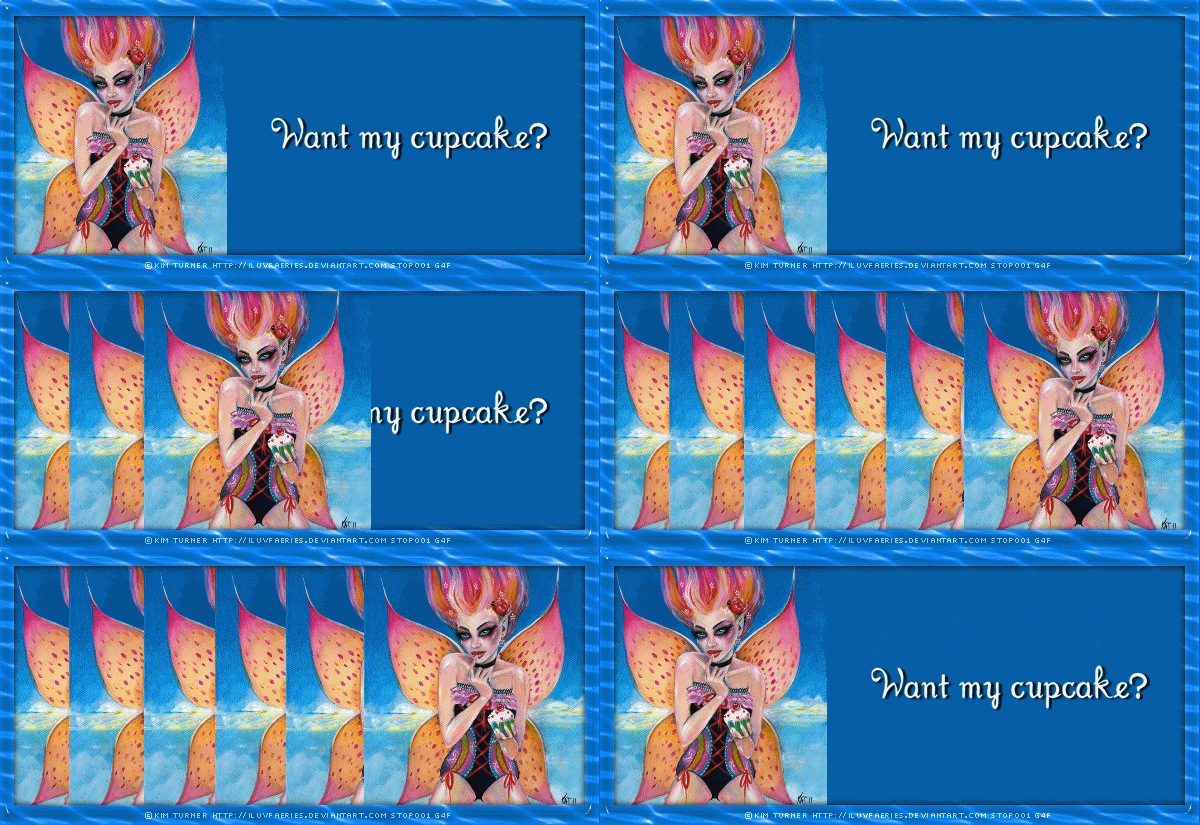
Back to the tag, you should have a background layer of a solid color, and a layer of the tube with it's background. Move the tube layer to the left. Duplicate the Tube layer five times. You should now have a total of 7 layers altogether.
Go to the bottom layer, create a new layer above it, to add your text. You can put any phrase you wish. I picked white for the color. I added a drop shadow on the same layer with these settings.
V. - 1
H. - 3
Op. - 100
B. - 3.19
C. - Black
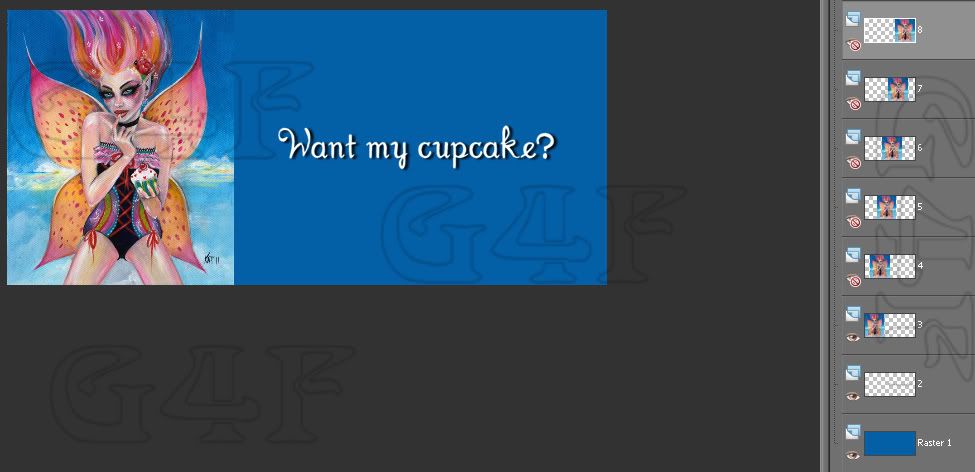
You will now have 8 layers: Bottom/background, Text, Original Tube, 5 Duplicate tube layers. Label your layers 1-8;
Hide the duplicate tube layers. Only the background layer, the text layer and the original tube layer should be visible. (Layers 1, 2 and 3)
Keeping the text on this second layer, move the text to the right of layer 3.(Click to see the layers)

Copy Merge and take to AS, Paste as a New Animation. Come back to your tag.
Unhide layer 4, move to the right of layer 3, Copy Merge, Carry to AS, Paste AFTER the first frame,
Unhide layer 5, move to the right of layer 4, Copy Merge, Carry to AS, Paste AFTER the second frame,
Unhide layer 6, move to the right of layer 5, Copy Merge, Carry to AS, Paste AFTER the third frame,
Unhide layer 7, move to the right of layer 6, Copy Merge, Carry to AS, Paste AFTER the forth frame,
Unhide layer 8, move to the right of layer 7, Copy Merge, Carry to AS, Paste AFTER the fifth frame.
You should now have 6 frames in Animation Shop. You can either Copy the Tag Frame you pasted earlier in AS (no animation on this frame) or you can continue with the tut and animate the frame. *Please make sure to have the "Propagate Paste" icon ticked in AS.
If you decide to stop now, while still in AS, go to your Tag Frame, select it and copy, go back to your 6 frame tag animation, highlight the first frame, then select all, and then Paste INTO selected frame. The Tag Frame will propagate into all the frames. You can save as a gif and you are done with the tag. Continue below for the avatar.
For those continuing:
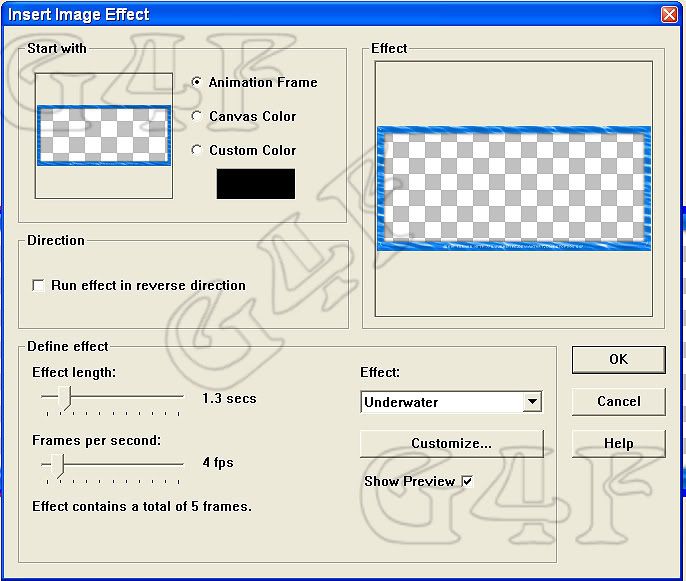
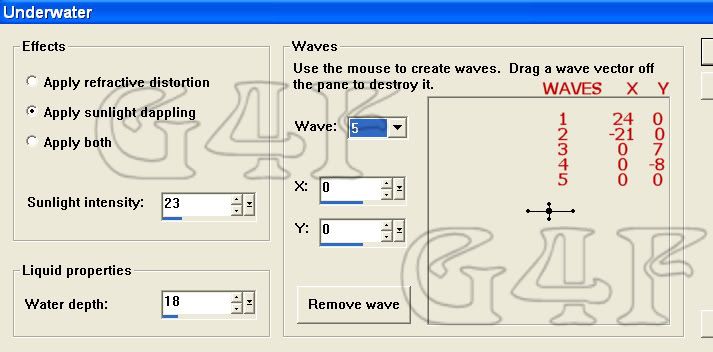
Go to your Frame, highlight it and then Insert Image Effect: Underwater with the settings in the screenshots (3 & 4). You will have 6 Frames, highlight and CUT the
first frame.


Because the timing of the frame animation and the timing of the tag animation are different, we have to adjust the number of frames.
Still working with your Frame set, select all, Copy, highlight the last frame, then Paste AFTER CURRENT FRAME. This will give you 10 frames. Highlight the last frame, the again Paste After Current Frame.
Repeat this until you have 30 Frames in all..
Leave for now and go to your 6 Tag frames. You want the one Frame that is Open (just the one tube image and the text) to show for an extended length of time. You also want the closed Frame (where the text is completely covered by the many tube frames, like an accordian opening and closing), to be closed for an extended period of time. If you changed the frame properties on the these 2 frames, it would interfere with the rhythm of the Tag Frame animation so therefore, you will need to add more of the open and closed frames to make it all work together.
First thing is to select all 6 frames of the tag, copy and highlight the last frame, then paste After the current frame. Then reverse the frames. You now have 12 frames with the animation rapidly opening and closing back and forth. We are going to highlight and copy the 1st frame and then paste after the Current frame so that you should have 2 frames like the first frame. Repeat this so that you end up with a total of 11 frames, all of 1st frame.
Now go to Frame #16, it should be the first frame with the tube all the way across. Highlight it, copy and then Paste After current Frame. Do this until you have 9 copies of Frame 16 so that there are a total of 10 frames of frame 16.
The complete number of frames for the Tag animation should be 30, the same number as the animated Tag Frame . Go to your Tag Frame, select All, Copy and then go to the Tag frames, select all and Paste into the current frame and you should have all 30 tags frames with the animated Frames. I set the frame properties to 12. If you are satisfied with this speed, you can save it.
Go back to PSP and make your avatar.
Create a new layer 150x150. Flood fill with the same color as you used in the tag. Duplicate this layer. I used the tube image without the background and reduced it to 25%. Copy and paste as a new layer, moving it between the two solid layers.
Using the Square selection tool, cut the center out of the top layer like you did with the tag. I increase the avatar by about 300% so I can see the marks on the ruler. Select the 5 marks top and side, move to the opposite corner to the same markings, and cut this out. This frame is too small to run through the glass filter so just add the drop shadow with the same settings as you did for the frame in the tag:
V. & H. "0" ; the O. of 100, & B. 3.19; color Black
Add the same drop shadow to the tube layer as well. Merge the three layers.
Add your artist copyright and your license number. Add you name. I used the same drop shadow settings for the name as I used for the text in the tag.
V. - 1
H. - 3
Op. - 100
B. - 3.19
C. - Black
Merge all and save.
You may also use this extra avatar frame I have included here:

Just right click and save to your computer. Use this instead of making a frame for the avatar and continue follow the steps.
You have completed this tutorial.
Please let me know how you did.
By using any item from this Blog, you agree to the TOU.