Monday, May 28, 2012

Want My Cupcake Tutorial


This Tutorial, "Want My Cupcake" was created on 27 May 2012 by me and is the registered property of Graphics4Fun PSP Tutorials. All my tutorials are registered with Tutorial Writers Inc, the Tagging Community's premier tutorial registration company.

This tutorial is written in and for PSP X2 and assumes you have an excellent working knowledge of PSP and Animation Shop. Please use my tutorial as a guideline and you are encouraged to try your own ideas.

Remember to save your work often. Finished tag will be over 1MB.

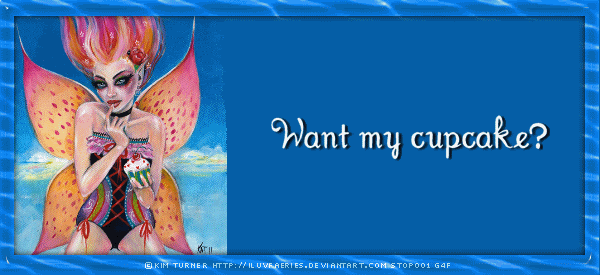
For this tutorial I am using "Lucy Loves Cupcake", a tube by Kim Turner purchased from PSP Tube Stop. You need a license to use her work. Many thanks to PSP Tube STOP for allowing me to use the wonderful work of Kim Turner.

You may use whatever font you wish. I am using a free font,  "Missed Your Exit". Click the link to download the font.

I am using Eye Candy 6, Glass effect. If you do not have Eye Candy, you can download the free trial version here or skip that section and just add the drop shadow to the frame.

Lets Begin

Create a layer 600x275 (if you want to increase or decrease the tag size, you will need to adjust the percentage of the tube in the next step to suit your tag.)  Open your tube and reduce to 45% and copy & paste the image with the background as a new layer. Flood fill the bottom layer with a color of your choice. 

Duplicate the bottom layer and move it to the top.

Using the Selection tool set to "Rectangle", create & cut out a section of the top solid layer. I like to come in about 5/10ths (5 little lines), on the top and side and drag the rectangle box to the opposite corner, stopping at the same points. Once you have cut the center out, copy the frame and paste as a new image layer with a transparent background (you can delete this layer on the tag).

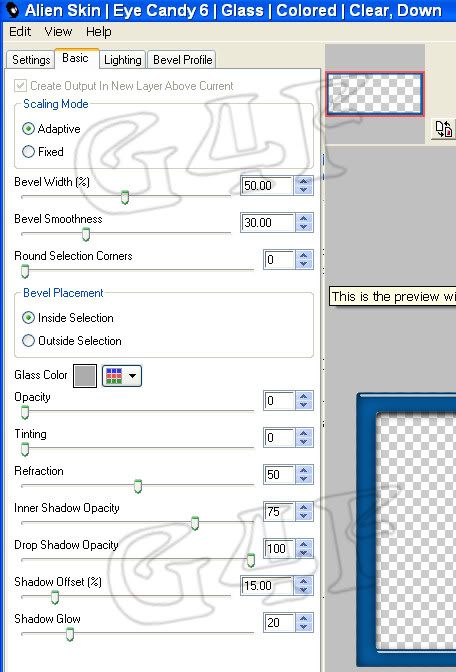
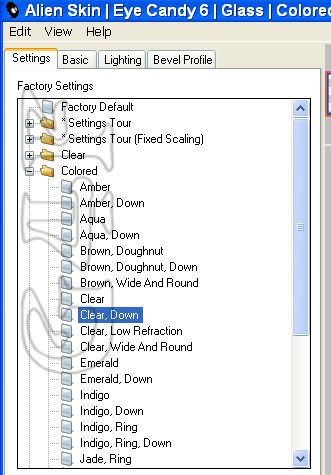
Go to your Eye Candy 6, Text_Selection, Glass and follow the 2 screenshots. The Bevel Profile is the Factory setting "Button".  Add drop shadow with a V. & H. of "0" and the O. of 100, & B. 3.19.  Color Black. On the frame I also add my credits and license number. Merge VISIBLE and carry to AS and leave it for now. ( For credits, I use Pixelette 8pts, anti-alias off).


Photobucket

Back to the tag, you should have a background layer of a solid color, and a layer of the tube with it's background. Move the tube layer to the left. Duplicate the Tube layer five times. You should now have a total of 7 layers altogether.

Go to the bottom layer, create a new layer above it,  to add your text.  You can put any phrase you wish. I picked white for the color. I added a drop shadow on the same layer with these settings.

V. - 1
H. -  3
Op. - 100
B. - 3.19
C. - Black

You will now have 8 layers: Bottom/background, Text, Original Tube, 5 Duplicate tube layers. Label your layers 1-8;  Hide the duplicate tube layers. Only the background layer, the text layer and the original tube layer should be visible. (Layers 1, 2 and 3)

Keeping the text on this second layer, move the text to the right of layer 3.(Click to see the layers)


Copy Merge and take to AS, Paste as a New Animation. Come back to your tag.

Unhide layer 4, move to the right of layer 3, Copy Merge, Carry to AS, Paste AFTER the first frame,

Unhide layer 5, move to the right of layer 4, Copy Merge, Carry to AS, Paste AFTER the second frame,

Unhide layer 6, move to the right of layer 5, Copy Merge, Carry to AS, Paste AFTER the third frame,

Unhide layer 7, move to the right of layer 6, Copy Merge, Carry to AS, Paste AFTER the forth frame,

Unhide layer 8, move to the right of layer 7, Copy Merge, Carry to AS, Paste AFTER the fifth frame.

You should now have 6 frames in Animation Shop. You can either Copy the Tag Frame you pasted earlier in AS (no animation on this frame) or you can continue with the tut and animate the frame. *Please make sure to have the "Propagate Paste" icon ticked in AS.

If you decide to stop now, while still in AS, go to your Tag Frame, select it and copy, go back to your 6 frame tag animation, highlight the first frame, then select all, and then Paste INTO selected frame. The Tag Frame will propagate into all the frames. You can save as a gif and you are done with the tag. Continue below for the avatar.

For those continuing:

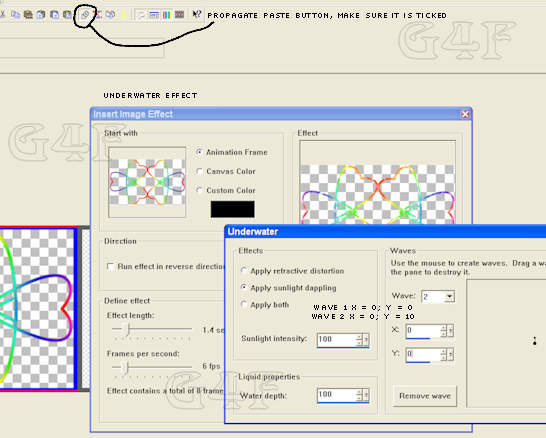
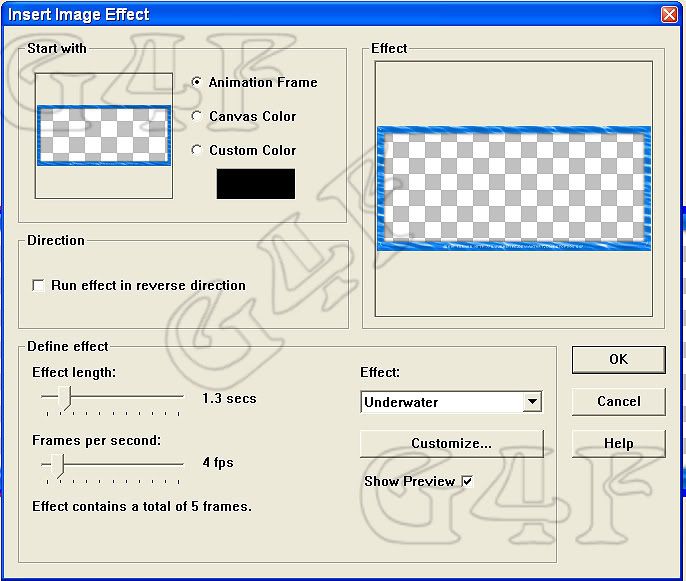
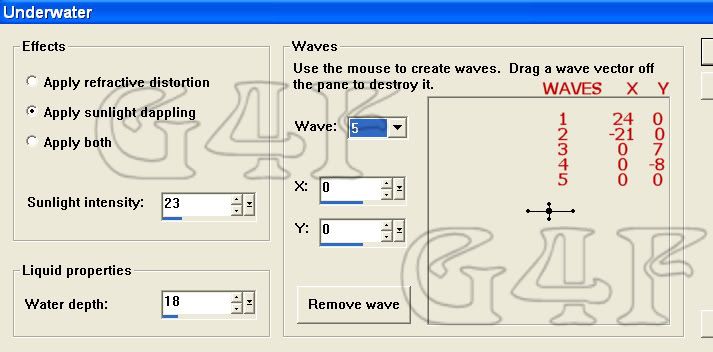
Go to your Frame, highlight it and then Insert Image Effect: Underwater with the settings in the screenshots (3 & 4). You will have 6 Frames, highlight and CUT the first frame.


Because the timing of the frame animation and the timing of the tag animation are different, we have to adjust the number of frames.

Still working with your Frame set, select all, Copy, highlight the last frame, then Paste AFTER CURRENT FRAME. This will give you 10 frames. Highlight the last frame, the again Paste After Current Frame.

Repeat this until you have 30 Frames in all..

Leave for now and go to your 6 Tag frames. You want the one Frame that is Open (just the one tube image and the text) to show for an extended length of time. You also want the closed Frame (where the text is completely covered by the many tube frames, like an accordian opening and closing), to be closed for an extended period of time. If you changed the frame properties on the these 2 frames, it would interfere with the rhythm of the Tag Frame animation so therefore, you will need to add more of the open and closed frames to make it all work together.

First thing is to select all 6 frames of the tag, copy and highlight the last frame, then paste After the current frame. Then reverse the frames. You now have 12 frames with the animation rapidly opening and closing back and forth. We are going to highlight and copy the 1st frame and then paste after the Current frame so that you should have 2 frames like the first frame. Repeat this so that you end up with a total of 11 frames, all of 1st frame. 

Now go to Frame #16, it should be the first frame with the tube all the way across.  Highlight it, copy and then Paste After current Frame. Do this until you have 9 copies of Frame 16 so that there are a total of 10 frames of frame 16.

The complete number of frames for the Tag animation should be 30, the same number as the animated Tag Frame . Go to your Tag Frame, select All, Copy and then go to the Tag frames, select all and Paste into the current frame and you should have all 30 tags frames with the animated Frames. I set the frame properties to 12.  If you are satisfied with this speed, you can save it.

Go back to PSP and make your avatar.

Create a new layer 150x150. Flood fill with the same color as you used in the tag. Duplicate this layer. I used the tube image without the background and reduced it to 25%. Copy and paste as a new layer, moving it between the two solid layers.

Using the Square selection tool, cut the center out of the top layer like you did with the tag. I increase the avatar by about 300% so I can see the marks on the ruler. Select the 5 marks top and side, move to the opposite corner to the same markings, and cut this out. This frame is too small to run through the glass filter so just add the drop shadow with the same settings as you did for the frame in the tag:

V. & H.  "0" ; the O. of 100, & B. 3.19; color Black


Add the same drop shadow to the tube layer as well. Merge the three layers.

Add your artist copyright and your license number. Add you name. I used the same drop shadow settings for the name as I used for the text in the tag.

V. - 1
H. -  3
Op. - 100
B. - 3.19
C. - Black

Merge all and save.

You may also use this extra avatar frame I have included here:

Extra Avatar Frame

Just right click and save to your computer. Use this instead of making a frame for the avatar and continue follow the steps.

You have completed this tutorial.

Please let me know how you did.


By using any item from this Blog, you agree to the TOU.

Monday, May 14, 2012

Finally Back Plus FB Timeline Covers

I want to say that I am back and feeling better after a month and half hiatus.

Many things happening around my world. My daughter and her 2 girls, my granddaughters, have moved back with me. Since this is a 1 bdrm apt, you can imagine the adjusting we are all doing. My granddaughters are 4 & 5 so they think all of this is just a new adventure. Through the eyes of children, the world looks great!

There is a new project on the horizon but we have not been able to confirm the opening date so I will just say that as soon as we are set, I'll make an announcement. We are shooting for June 1st but again... that is tentative.

Many of you are using Facebook. I make my own timeline covers so I will post some here. If you would like to comment about the themes you would like, that will give me an idea of what to make. Be aware that some artist have included in their TOU that their tubes are NOT allowed for Facebook Timeline Covers.

I made these Covers this morning from the new scrap kit by Rebel Without A Pause Designs titled "The Roses" and this part of the kit is "The Roses: Roses for Momma". Click to view full size, save to your computer and upload to your facebook account.


G4F

Graphics 4 Fun FB Timeline Covers


The second Facebook Timeline Cover is a frame with a transparent center, in which you can insert a photo of your family or friends, or anything you wish. Just open your favorite photo editing program, open this image (once you have downloaded it to your computer) and then create a new layer beneath the Cover image and then open your family or friend image, move it between the two layers until you are satisfied and merge all and save as a new image.

I have received a lot of compliments on the choice of font I used. You can find the font at FontYukle, click here: "BickhamScriptFancy2".

This second framed FB Timeline Cover has a 1930s Alfons Mucha image.  I love Alfons Mucha art and use it as often as I can.


G4F_FacebookTimelineCovers


Enjoy and don't forget to point folks back here to grab the timeline covers. Please leave a comment, thank you.

By using any item from this Blog, you agree to the TOU.

Wednesday, March 14, 2012

Teddy and Butterflies Snags

 One of my favorite places to get awesome clip art is Barry's Place, also known as PSPTubez.com and it is really easy to join. This is a membership site and right now he is offering membership specials like 25% off and he has a 2-day Trial membership for only $5.95! That is the safest bet you could ever take! See the Membership Sign-Up for the different levels.

Today's snags are made from a gradient and tubes from Barry's Place.


By using any item from this Blog, you agree to the TOU.

Monday, March 12, 2012

Website Buttons You Can Use

Tutorial Writers, Inc. have a wonderful forum and one of the most fun challenges I have seen is "Wordless Wednesday". The moderator picks a different theme each week and we create the item without any commentary other than our watermark.

Last week's theme was "Web Design Buttons". I had intended to just do one and post it but decided to do a set of nine. These were made from my own flower photo so I am posting them here as well and you can use them if you wish. I don't think resizing will work well but if you can, and you are satisfied with the result, then I don't mind.

Please do not claim these as yours. You do not need to give me credit but please do not take credit either.


Web Icons by Graphics4Fun


By using any item from this Blog, you agree to the TOU.

Saturday, February 25, 2012

Snags from Over the Rainbow Scrapkit

These were made from the wonderful new collaborative scrap kit "Over the Rainbow" on sale now at PSP Tube Stop. The effects are a tiny bit different than in my tutorial but that was because I wrote the tutorial a day of so after I had completed these tags.

Photobucket

Photobucket

Photobucket

Photobucket

Photobucket

Photobucket


By using any item from this Blog, you agree to the TOU.

Dreaming of Happy Days Tutorial


Dreaming of Happy Days


This tutorial is mine and was created on Feb 24, 2012. Any similarity to other tutorials on the Internet is unintentional. Please do not copy or place this tutorial or any graphics on another website without written permission directly from me. Thank you.

This tutorial is written in and for PSP X2 and assumes you have a working knowledge of PSP. Please use my tutorial as a guideline and you are encouraged to try your own ideas.

Items you will need:

The PTU "Over The Rainbow Scrapkit" found at PSP Tube Stop

Font: Lavanderia Regular This is a Free font.

Mask: VIX Mask 362

Animation Shop.


Lets get started:

Start with a 500 x 500 pixel transparent image

Flood fill white

Open Green Shamrock Paper, resize to 500x500px, copy and paste onto the tag as a new layer and move below the white layer.

Apply Vix-Mask362, make sure the "Invert Transparency" is checked. Merge Group.

Select the white mask layer and manually expand it by selecting the "Pick" tool and adjusting the size until you have as much of the mask to the outside edges (left & right and top & bottom) as possible without cutting into the design. The mask layer will be narrowed on the sides and stretched top to bottom.

After adjusting to your satisfaction, Merge All.

Open the Shamrock Knot Rainbow element, resize 85%, rotate right, copy & paste onto the tag as a new layer, do this twice. Select one of the Knot layers and Mirror it. Move the 2 layers to where they are touching in the center of the tag. See screenshot:


Hide the back ground layer, leaving only the 2 knot layers,highlight on of the visible layers and merge visible. Copy this layer and take it to Animation Shop, paste as a New Animation.

Go to Effects and then Insert Image Effects.

See Screenshot of Underwater Effect Settings.


Select Underwater --> "Apply sunlight dappling" --> Sunlight intensity 100--> Sunlight depth 100 --> 2 waves:
Wave 1; X = 0 ;Y = 10
Wave 2: X = 0; Y = 0

Click OK. You will have 9 frames. Cut the 1st Frame in the panel so that you now have 8 frames.

Leave this for now and return to PSP.

Add drop shadow to the Rainbow Knot layer Vertical = 0; Horizontal = -1; Opacity = 100; Blur = 5.00; color = Black

Merge all layers.

Open the Rainbow2 Element, copy and past as a New Layer onto the tag base, above the Rainbow Knots (see position on the tag example). Now we are going to cut the ends so it sits on the knots. Using the Freehand Selection tool, crop around the ends of the Rainbow like in the screenshot.


Once you have done both ends, copy the Rainbow2 layer and take to Animation Shop, paste as a New Animation, then Insert Effect and this time use these settings:

Select Underwater --> "Apply sunlight dappling" --> Sunlight intensity 38--> Sunlight depth 49 --> 5 waves:
Wave 1; X = 0; Y = 5
Wave 2: X = -5; Y = 1
Wave 3: X = 3; Y = 0
Wave 4: X = 0; Y = -5
Wave 5: X = 0; Y = 0

Leave the Rainbow animation and go back to PSP

Hide the Rainbow layer of the tag. Copy ONLY the merged tag base and carry back to Animation Shop, paste as a New Animation, and then duplicate it until you have 8 frames. (Make sure your propagate paste button is clicked )

Go to your Rainbow Knot underwater animation, make sure all frames are selected, then copy and paste into the 8-frames of the tag base, positioning on top of the knots in the tag.

Select All on the Rainbow animation, copy and paste into the selected frames, placing it to sit on top of the Knots.

Return to PSP, open "LeprechaunGirl", copy and paste on top of the tag, add drop shadow twice. 1st time: Vertical = 0; Horizontal = 3; Opacity = 100; Blur = 5.00; color = Black

2nd time: Vertical = 0; Horizontal = -3; Opacity = 60; Blur = 5.00; color = Black

Copy this layer and carry to Animation Shop, paste as New Animation and then copy and paste into the tag base... position where you would like.
Return to PSP

Open 2 butterflies of your choice, I picked the blue & red ones. Resize 25%. Pick one butterfly and Mirror.

Apply Drop Shadow to both Butterflies using these setting:
Vertical = 0; Horizontal = -3; Opacity = 60; Blur = 5.00; color = Black

Copy and paste as New Animation in Animation Shop and then Copy and Paste each Butterfly into the frames like the tag example.

Go back to PSP can create your copyrights, and then copy and paste into Animation Shop as New Animation, then copy and paste into tag frames.

Use any font you wish with any phrase you like. I used the free font Lavanderia Regular, 60pt, color Black with Drop Shadow with these settings:
Vertical = 0; Horizontal = 0; Opacity = 100; Blur = 3.00; color = Black

Copy and carry to Animation Shop, paste New Animation, copy and paste into your tag. You are finished.

Congratulations

By using any item from this Blog, you agree to the TOU.

Friday, February 24, 2012

Stepping Down from the 4Tart Lovers Forum

Last night I stepped down as Administrator of the "4Tart Lovers" forum.

All I will say as to "why" is just differences in management styles and lack of clear communication.

The blame is as much mine as anyone's so I will not lay it at the feet of another. 

Please continue to visit and join the forum. It is a great place if you are looking for a slower paced, more personable and bit less daring forum. ; - )

I wish every one over there the very best and I have no hard feelings toward anyone. I hope that feeling is mutual. 

OPEN APOLOGY TO THE MEMBERS:
An apology to the membership is in order (the Moderators were informed) as it was an abrupt departure on my part but the circumstances, I felt,  warranted this action so please understand, the decision had nothing to do with you, the members.
 Good luck and Happy PSP'ing!


By using any item from this Blog, you agree to the TOU.

Saturday, February 11, 2012