

I used Lisa Cree's "Snow White" tube for this tutorial.
This tutorial was created 5 Dec 2011 by myself, Graphics4Fun.
This is my creation, any similarity to other tutorials on the Internet is unintentional.
Please do not copy or place this tutorial or any graphics to any other place without written permission directly from me. Thank you.
This tutorial is written in and for PSP-X2 and assumes you have a working knowledge of PSP.
Items you will need:
You will need to purchase this "Snow White" tube by Lisa Cree from PSP Tube Stop and you must have a license to use her work.
You will need Animation Shop. (If you don't have AS and want to make the tag, just use 1 layer of the 3-layered red frame mask.)
Lets, begin
Download the supply zip: http://bit.ly/G4FTutSupplies
Open the Supplies Zip and find:
1. White and Green Background
2. Various word art
3. Red frame mask in 3 PSP layers
Link for the original Mask by "Art Work by EssexGirl"
Open your purchased Snow White tube and resize her to 72dpi and 57%. Add shadow with these settings:
0
10
35
3
color black
Next Open the White and green background layer. You will notice it has some little black marks on it. These are hand drawn guides to position the Tube when you carry it to Animation Shop (or just paste her onto as a new layer if not animating).
Take background to Animation Shop--> Edit --> Paste New Animation and then go to Edit -- Paste --> After Current Frame.
Repeat this last step.
You should have a 3-frame panel. Click the first frame then go to Edit --> Select all and stop.
1.Make sure the Propagate Paste button is ticked (see screenshot).
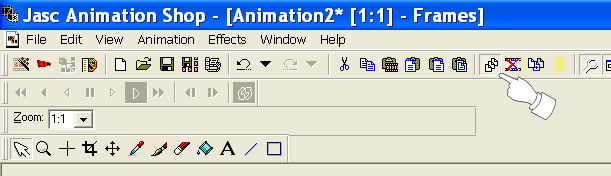
2.Make sue the Propagate Paste button is ticked!
*Now go to PSP and get Snow White, Edit --->Copy and carry to Animation Shop--> Edit --> Paste New Animation and then back to Edit --> Copy. Take the copy of the tube (still in AS) to the 3-frame panel (background) and Edit --> Paste --> Into Selected Frame.
Position within the little marks on the 1st frame of the background panel and when you have it where you want it, release the mouse and the tube should be in the correct position on all 3 frames. If not, check to see if the Propagate Paste button is ticked, Go to Edit -->Undo and then Edit--> Select All and then Edit --> Paste-- Into Selected Frame and complete the Paste Into Selected Frame step.
Now go back to PSP and open your Red-frame mask to find the 3 layers. Save As PSP Animation Shop (you'll need to name it "red frame" or something) so it reads, "redframe.psp". (Make sure this is "PSP Animation Shop")
Go to Animation Shop, File -->Open and find that file and it will open into a 3-frame panel. If you want to make sure it is the right one, go to View-->Animation and you should see the glittering frame.
Now while in the 3-red-frame panel, select the 1st frame then Edit--> Select All and then Edit-->Copy.
Take to your previous 3 frame panel of the background and tube and Edit--> Paste --> Into Selected Frame.
Go back to PSP, add your credits, convert to raster layer, copy and take to AS, paste as a new animation, copy and paste on to your 3 panel tag, save as TagBase.mng
Open into PSP the word images you want to put into your tag. These are .png files. Copy each image and place into Animation Shop following the *steps above. When you have your tag like you want, save as gif.
If you are NOT animating the tag, just pick the word images and paste as new layers on top of which ever red frame layer you added to the tag. Once you have it like you want, just merge all and save as png or jpg, your preference.
The following are also Snags and I hope you enjoyed making the tag.


By using any item from this Blog, you agree to the TOU.
No comments:
Post a Comment
Please leave some luv! :-)
Thank you