

This "Red Holly Winter" tutorial was created 10 Dec 2011 by me and is the registered property of Graphics4Fun PSP Tutorials.
This is my creation, any similarity to other tutorials on the Internet is unintentional. Please do not copy or place this tutorial or any graphics to any other place without written permission directly from me. Thank you.
This tutorial is written in and for PSP X2 and assumes you have a working knowledge of PSP. Please use my tutorial as a guideline and you are encouraged to try your own ideas. Remember to save your work often
Items you will need:
"Red Holly" tube by Renee Lavoie. You can purchase this tube from PSP Tube Stop and you must have a license to use her work.
Premade animated background in 10 layers, found in the Supply Zip. The background is the Premade Background-372 by AshenSorrow and is used here with their permission. Via their TOU, credit must be included on the tag and the wording is supplied in the tutorial.
Mask G4F-550x550, which I have created and supplied in the Supply Zip.
Text: I am using "TXT Sloppy Script", a PTU font ($3 at Lettering Delights) and is NOT included in the Supply Zip. You can use any font you wish
Download SupplyZip
Unzip your supplies.
Put the mask in your mask folder
Open 10-LayerAshenSorrowBackgroundWithSnow
Starting from the bottom, rename frames 1, 2, 3...etc until the top frame is 10.
Save as PSP (Animation Shop) where you can find it again to open in Animation Shop. You may now hide all the layer except #10.
NOTE: If you are NOT making the animated tag, you can pick the layer you want for the background, hide all other layers.
Open your "Red Holly" tube pack by Renee Lavoie. Select the center tube layer without the background or the holly vines. Resize image to 72dpi, and 75%
Copy and paste as a NEW layer above all the background layers. Position where you want it to be in the tag.
Create new layer, flood fill with white and apply the mask.
You will find the mask has covered part of her left wing. Click the tube layer and from the layers pallet, duplicate the tube. Now you have 2 tube layers and then the mask layer.

Drag the copy of the tube so that it is above the mask layer.

Select the Freehand Selection tool (lasso) from the Selection tool (left menu) and draw an area around the bottom of the top tube layer. (See screenshot-Selection Tool) Setting the Feather to 6 and the Smoothing to 16, anti-alias checked. (Click to see full size image)
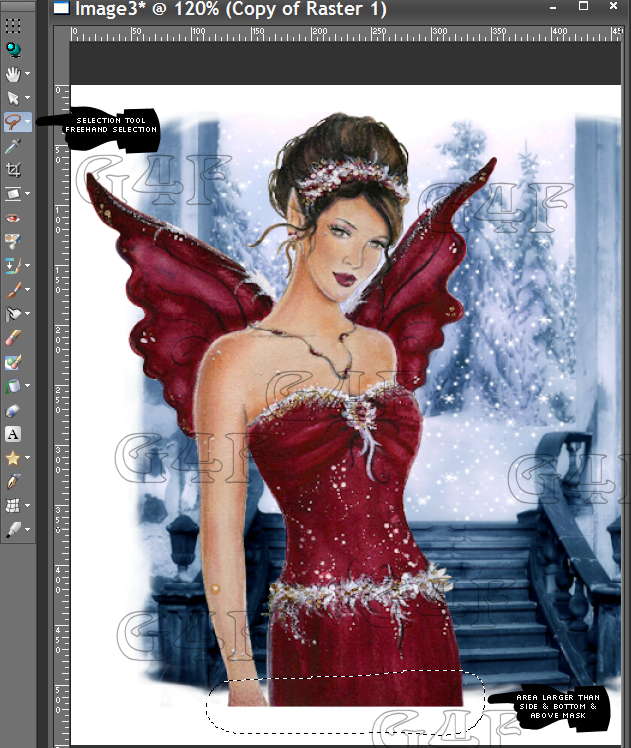
Go to Edit ---> Cut. You should now see the mask has covered by the bottom of the tube and the wing is on top of the mask.
Go to top menu, select Selections---> Select None to get rid of the outline of the area (dashed line) below.
Now add shadow to the top tube layer with these settings:
-2
3
27
3.00
color black
Close off/hide all layers except the top 3. (the tube layer, mask layer, shadowed tube layer).
Merge visible
Add credits on a new layer (*you are required by the TOU to credit the premade background supplied by AshenSorrow). Credit wording is also in the Supply Zip :
©ReneeLavoie www.reneellavoie.com <your PSP Tube Stop License#> *Bckgrd by ashensorrow.deviantart.com" and any personal credit you use. Merge visible.
You now have 11 layers, the 10 background and the tube layer.
If you are NOT making an animated tag, you can unhide any one of the ten background layers and then Merge All. You can add any text you wish, Save and you are finished.
If you ARE making the animated tag, continue:
Open Animation Shop, find the file where you saved the 10-layered-background as "PSP Animation Shop" (.psp). Open this in Animation Shop and you have 10 frames. You can run the animation to make sure it works fine if you wish.
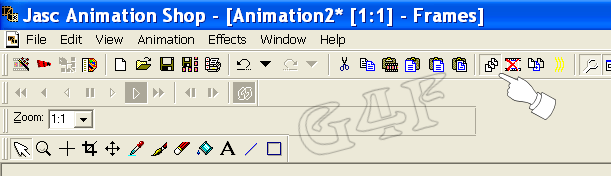
Make sure the Propagate Paste button is triggered/activated. (Click to see full size image)
Select the first frame, then go to Edit---> Select All
STOP
Go to PSP and highlight the top layer only. This is the mask/tube layer with the credits. Copy and take to Animation Shop, Paste as a new animation, then copy and paste into the 10-frame background group. It should propagate into all frames.
Back in PSP, I now add my text. I used the light blue of the background and added a .50 width white outline (see Text Properties). I then added a shadow with these settings:
0
0
70
7
Black
Duplicate the Shadow step again.
Copy the text layer and carry to AS where you will add as a New Animation.
Then with the frame group highlighted, go to Edit---> Paste ---> Into Selected Frame and it should paste into all frames.
Save as .gif and you are done.
Thank you for trying this tutorial.
I always like to see your results. Please post a link to your results or email it to me and I may include it on a results page!
All my tutorials are registered with Tutorial Writers Inc, the Tagging Community's premier tutorial registration company.
Below are some Snags. Please enjoy using these:

By using any item from this Blog, you agree to the TOU.
No comments:
Post a Comment
Please leave some luv! :-)
Thank you